While setting up WordPress for the first time, it will ask you to create a login username and password. By default, the username is ‘admin’ which is pretty risky to use for security reasons. However, when you are going to change the username from the WordPress you will see you cannot do so.

So if you are in the situation of changing your WordPress blog username for security or some other reasons here in this guide we will show you the 3 different ways for changing the username.
- Method 1: Add a New Username and Remove the Old One
- Method 2: Change Username Using a Plugin
- Method 3: Change Username Using phpMyAdmin (via hosting control panel)
Without further ado, let’s start.
Method 1: Add a New Username and Remove the Old One
This one is the easiest and quick way to change the username. However, for this method, you will require a different email address than the one you are already using with WordPress. So, if you don’t have a different email address be quick and create the new one.
For creating a new username:
- Login to your WordPress
- Go to Users >> Add New
- Here fill in the required fields such as Username, Email, and set the “Role” as Administrator. Double-check the email address as WordPress will send the important notification on this as well as it is needed when resetting a password.
- Below the password, you will also see a checkbox to receive the user’s login credentials via email.
- And then hit the Add New User.
Now log out from WordPress and then Sign in using your new account that you just created. Navigate to Users >> All Users and you will see a Delete link under your old username.
So go ahead and click on delete.

When you click on Delete, WordPress will ask you want to do with the old user content like you may have published posts with your old username.
So in that case make sure you select ‘Attribute all content to:’ and then assign the new username.
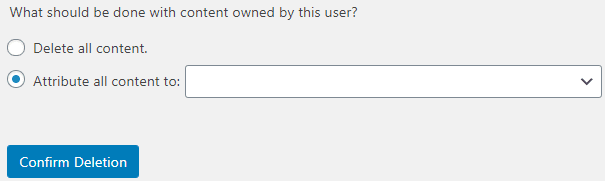
Now you can safely click on “Confirm Deletion”.
Now if you want to use the email address that you were using with the old username instead of a new email address, simply go to Users >> All Users and then Edit the user.
After that change the email address and click on the “Update Profile” button given at the bottom of the page.
That’s all for the first method.
Method 2: Changing WordPress Username Using a Plugin
Another very easy way to change WordPress is to use the plugin. However, if you are very concerned about plugins management and don’t want to install plugins for every little task then the good thing you can remove the plugin after changing the username as it won’t undo the changes.
The problem with installing a plugin that every plugin puts some load on your server. So, if you are using the basic shared hosting plan it is recommended to avoid any such plugins.
For this method follow the below steps:
- Go to Plugins >> Add New in WordPress dashboard.
- There are many plugins like Easy Username Updater and WP Edit Username. The one we recommend is the Username Changer. So go ahead, install, and activate the plugin.
- After installing the plugin go to Users and click on the Edit link given below the username.
- On the next page scroll down and there you will see Change Username which is now showing because of the plugin. So now, you can change the username as shown in the below image.

- Click on Save Username once you have done changing.
Method 3: Change Your WordPress Username via phpMyAdmin
This is a little bit of a technical method of changing the WordPress username. This method involves changing the WordPress database that’s why we don’t recommend to users especially beginners.
However, we strongly recommend you should learn this method because of its foremost nature. For instance, you have forgotten your username or email address its means you are lockout of your WordPress.
So in such a situation, this method is going to help you. So for this method follow the below steps.
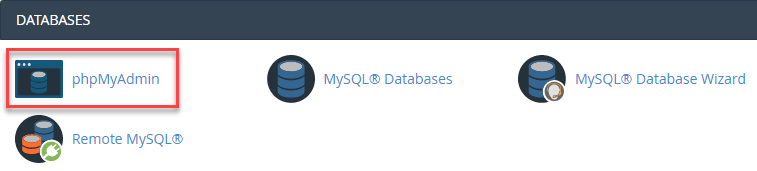
- Log in to your control panel (cPanel) provided by the hosting company.
- Scroll down a little bit until you find the Database section.
- Next, select the database your website is using.
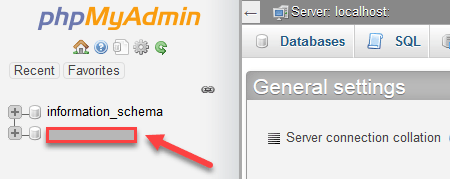
- After that, you will see all of your WordPress database tables.
- Now find and select the users which may be like ‘wp_users’ or ‘wpsk_users’ and then click on the Edit like in the below image we want to edit the second username.

- After clicking on the edit button, you will see many fields like ‘user_login’, ‘user_pass’, and ‘user_email’ etc. As we are here just to change the username so go ahead and type your desired username in the Value column filed. Like you can replace ‘admin’ with ‘John’.

- After typing the new username scroll down and hit the Go And that’s it.
Now you can use the new username to login to your WordPress dashboard. However, here note that for logging into your WordPress dashboard your password will be the same as before.
The beauty of this method you don’t have to install any plugin or creating a new username, instead, it enables you to make changes to the existing username. However, as the database is a crucial part of your WordPress so you need to be very careful while making such changes.
We hope you find this tutorial very helpful and now able to change the username of your WordPress site. For more guides and tutorials keep visiting BloggingSilo and we will make sure to keep this site more informative for you.
If you like this tutorial please share your thoughts below in the comment section.