You just landed on this post because you are searching for how to easily create a drop-down menu in your WordPress website.
A dropdown menu contains links that you can see by hovering a mouse over it, and by clicking, it will lead you to that certain post, page, or category. Before I continue the guide on how you can easily add a dropdown menu in your WordPress website with absolutely no plugin or coding, take a practical example. Bloggingsilo is also using a dropdown menu, so go ahead mover your mouse on the navigation bar above (shown below the site name or logo).
Let’s begin. I will guide you step by step on how you can create a dropdown menu easily, even if you are a beginner.
Quick Navigation- Prerequisite: How to Find a Theme with Dropdown Menu Support?
- How to Create Dropdown Menu in WordPress?
- What is the Mega Menu?
- What are the Mistakes You Should Avoid in the Navigation of Your WordPress Website?
- Tips to Improve Your Dropdown Menu in WordPress site
Why is it Essential to Use a Dropdown Menu in the WordPress Website?
The beauty of WordPress allows you to perform lots of changes enormously easily with no coding skills; that’s why an excellent platform for creating a blog and websites. So that’s also the case while creating a navigation menu.
As I mentioned earlier, a dropdown menu links to the pages, posts, and categories. It typically appears below the website logo in the form of a horizontal row.
As soon as the visitors land on your website/blog, the first thing they will is the site logo/name and then the menu. So why not to use a dropdown menu and make them stay longer on your site.
Another great advantage of using menus, you can show the link to the important or trending content in minimal space. Further, if you have a lengthy post that spread over multiple pages, you can easily organize those in a proper hierarchy, so the user knows where to start.
Also, menus look pretty nice and cool. What do you think?
How Many Types of Navigation or Dropdown Menu?
It depends on a theme; usually, there are 2 types of navigation menus, i.e., Primary and Secondary.
What is meant by Dropdown Menu Locations?
However, a dropdown menu frequently shows up on the top, but that’s not merely the position. Normally a primary dropdown menu appears next to the site header while you can set a secondary menu at multiple locations like Above header, Below header, Left, Right, or on the footer.
Note: Types & location of dropdown menus is entirely theme relevant feature.
How to Create Drop Down Menu in WordPress
So let’s start how you can create a dropdown menu step by step.
Prerequisite: Choosing the Right Theme that Support Dropdown Menu
Although WordPress equipped with built-in menu management, however, displaying menus depends on the theme you are using on your WordPress site.
Rookies no need to worry, as dropdown menus are the fundamental part for every type of website; that’s why almost every WordPress theme comes with menu support. But, no doubt, there are also many themes with no proper menu support.
So if you want to make use of menus, make sure you are using the theme with dropdown menu support.
The question here that how you can know if that particular theme that you are using or going to use support dropdown menus?
It is straightforward to find that out. Just go to the website where you purchased the theme, and there you will find the link to view the theme’s demo. In the demo, if there is a dropdown menu, then it means the theme support dropdown menu; otherwise, if it won’t, then look for another theme.
There are lots of themes out there, which makes the theme selection process confusing, especially for beginners. In case if you need my assistance, here are a few remarkable themes with full dropdown menu support.
StudioPress: Built with Genesis framework, StuiodPress is a well-known theme provider for providing WordPress optimized themes. Currently, there are 60+ themes in their library, including the famous theme names like GeneratePro and Aspire Pro.
Astra: Astra is an impressive package of lightweight, fast, and customizability. They offer a broad amount of Starter sites, and most of them come with a dropdown menu.
FocusBlog: It is developed by ThriveThemes. Due to its simplicity and responsiveness, it very popular if you need a theme for a blog. If you secure a full membership, you can experience tons of their tools, including the well-known thrive architect (a page builder plugin).
OceanWP: You are a beginner and don’t want to invest in a premium theme that’s OK. OceanWP is one of the highly optimized WordPress themes with dropdown menu support. This multipurpose theme currently has 2016K + downloads.
GeneratePress: GeneratePress is an extremely lightweight, responsive, and performance focused theme that is built up by GeneratePress. It is free to use; however, with a premium membership, you can make use of more features. You can get full access to their SiteLibrary, premium modules at a very affordable price.
Divi: Developed by Elegant Themes, Divi has a huge fanbase. Indeed there are 2 things Divi theme and Divi builder, and with the combo of these two, you can build any type of page effortlessly. The good thing you can use Divi drag and drop builder with every WordPress theme.
Method 1:
Now let’s go ahead and take a look at how to create a dropdown WordPress menu.
Step 1: Create a Menu in WordPress
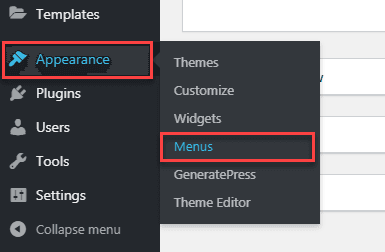
To get started, log in to your WordPress dashboard.
Then go to Appearances > Menus.
If you already have a menu, then simply skip this step. However, if you are here for the first time, WordPress may prompt you to create a menu.
For the sake of tutorial, I assume that you don’t have any navigation menu already. Go ahead, enter any name, and then hit Create Menu button.
As the name does not publically visible, so it doesn’t matter what you type. It’s just for you to easily recognize a menu if you have a list of menus.

Step 2: Adding Links to a Menu
Upon hitting the button, WordPress will create a menu for you. Now it’s the time to add links that will show on the top in a row.
You can add different types of links to a dropdown menu.
Simply, move the cursor over sidebar on the left side, select the pages you want to show in the dropdown menu, and then click on Add to Menu.

Similarly, from the sidebar, you can add the Posts, Categories, or a specific URL. Or you can even use a combination of these to display on a single navigation bar.
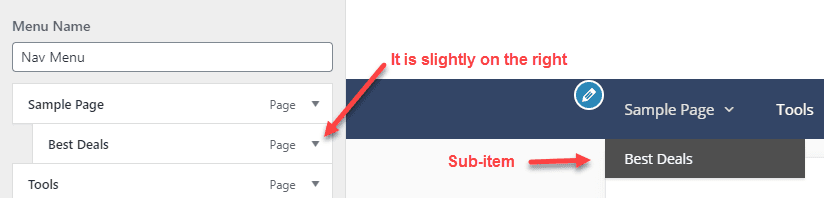
Step 2-a: Adding Sub-Item to a Menu using Drag and Drop
Sub-Items are the items that appear under the parent item.

The links that you add in Step 2 will appear on the top bar while sub-items are like inside the dropdown menu and appear when you hover the mouse over a dropdown menu item.
Similar to adding top links to the main navigation bar, you can add anything like category, posts, pages, or URLs as a sub-item.
So go ahead from the left column, select the items you want to add and then click on Add to Menu button. However, these links will appear with other links that you already added in the top menu bar.
So in order to make them appear as a sub-item, you simply need to drag and drop the item under the parent. After that, slightly move the item to the right side, and that’s it item it will show as sub-item.
Repeat the process for adding multiple sub-items. Similarly, you can add sub-items of sub-items.
Once you have done organizing the dropdown menu, don’t forget to click on Save Menu.
Step 3: Choose Menu Location
If you are already using a dropdown, then you don’t need to choose location; any changes you made will appear after saving.
However, for a new menu when you have done organizing the menu the next step is where you want to show the dropdown menu on your WordPress site. Usually, it appears on the top of your site so the visitors can access the important content easily instead of scrolling down to the bottom.
On the same menu page, you can choose the location in Menu Settings. As I mentioned earlier, the location of the menu totally depends on the theme.
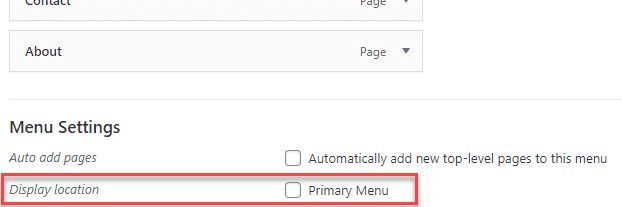
If you want to display your menu below the header, don’t confuse as the location name display on your WordPress dashboard might be different. Commonly, for such location, the names are something like Primary Menu, Top Menu, or Primary navigation.
That’s it you have successfully created a dropdown menu for your WordPress website.
Method 2: How to Create Dropdown Menu in WordPress with Live Preview
Although the first method is pretty straightforward, but there is also an alternative way, which I strongly recommend for beginners. It allows you to see the changes while creating and managing the menu.
That means while creating a Menu and adding items, you can see the changes even before applying it on your site. That’s amazing.
So how do you get into the Live managing mode?
Simply on the WordPress dashboard, go to Appearances > Customize.
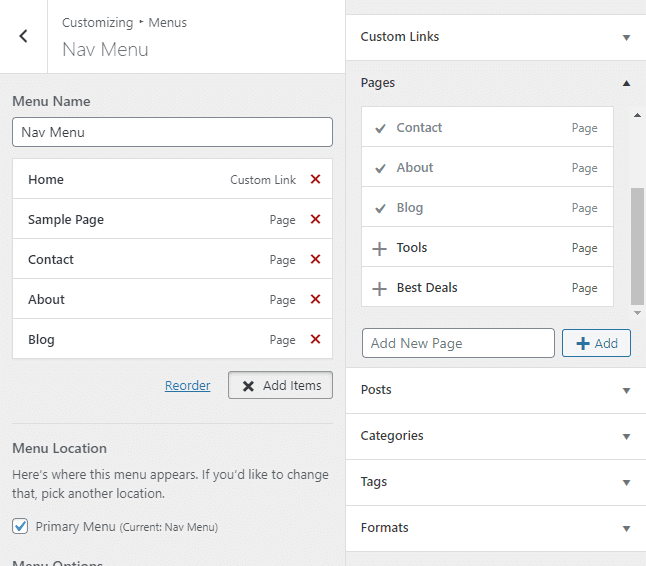
Once you inside the Live Customization mode, click on Menus, and then Create New Menu.
Give any name to the menu, select the location, and then Next.

Now Click on Add Items button choose the Pages, Posts, Categories, Custom URL, or tags to add in the menu. Furthermore, if you want to add a new page but haven’t created it yet, you don’t need to leave the screen. The Menu screen allows you to create and add new pages.
How to Add Sub-Items to a Menu
Similar to Method 1, adding sub-items under a parent link is extremely easy in Live Preview mode.
Slightly move the item to the right side, and there you go sub-item created. Look at the below image.
That’s it when you satisfied with your changes; click on the Publish button to apply on your live site.
What is the Mega Menu?
Where WordPress default dropdown menu shows just a single dropdown at a time, a Mega Menu provides you the ability to show all the sub-items under a parent link.
Don’t be confuse, Mega Menu is just like the dropdown menu, but it enables you to show a lot more items. Have a look at the below image.

Mega Menus gives your site a more professional touch and helpful for your site visitors. There are tons of plugins with easy to use experience. For a detailed guide, look into how to create a mega menu in WordPress, a step by step tutorial that explains everything.
Mistake You Should Avoid in the Navigation Menu of your WordPress Website
- Don’t Use Generic Terms for Menu Items
As the navigation menu occupy a prominent place on your site. It is among the first thing the visitors will see when they land on your website. So why to confuse the visitor? Instead of naming the items on the top bar as ‘Our Services’, be more precise by using terms that spell out your product. That is, think as a visitor not as an organization while typing top link names that you want to display on the navigation bar.
- Using the Wrong Order
As per the Psychology ‘serial position effect,’ a person tends to remember the first and the last thing. That’s also the case when it comes to a dropdown menu. So you need to display the items in the dropdown menu in proper order like most prominent at the begging and less significant in the middle.
- Too Many Items or Links in the Navigation Menu
One of the prevalent mistakes is that you try to put every item in your navigation. If you think everything is important, then try to list out the most important items. The goal is here to limit the number of items so that to simplify the navigation bar; thus, it does not confuse the visitors.
What I personally think there should be 4 to 5 items under each parent link. If you want to add more sub-links, you can try adding a separate button in the navigation bar like ‘More’ and then enlist all the other items under it.
You should also consider using Mega Menu if you think your dropdown menu is going to large. A Mega Menu allows you to display all the sub-items beautifully.
Or almost every theme supports the secondary menu so you can use it to show all the additional links. It can appear next to the primary menu.
- Making Dropdown Menus Complicated
It is also one of the very common mistakes that people do. A dropdown menu consists of a list of items, and then those items include more dropdown menus. It is sometimes even made it painful for the visitor to click on the right link. What I can say that just avoid it. Likewise, with so many choices, you may confuse your visitor, and the dropdown menu which you are using to assist your visitors/customers may turn into your con.
- Using Bad Style Navigation
While organizing the dropdown menu, keep in mind the color scheme. If you are using some kind of color-rich background image, it may affect user readability. Additionally, the use of a muddled combination of icons, images, and buttons makes your site more weird. You should absolutely avoid this as you may distort the purpose of a dropdown menu by making it colorful or interactive in your perspective.
- Lack of Responsive Design
Due to the increasing use of mobile devices, there is also a considerable amount of people who access web pages on mobile devices. According to the latest studies, the mobile market (52.1%) beat the computer share (44.2%).
So it is most essential to look that your dropdown menu is responsive to mobile devices. The excellent thing almost every theme demo offers you the view of how your site will look like when opening on a computer, mobile, and tablet device. Besides, why not open your website on your mobile device and verify if its working fine or not.
Tips and Tricks on Creating Dropdown menu
- The User Perspective
While naming the menu items, take the user perspective not your own. Whether you are selling products and services navigation menu helps a lot. For example, for a computer company, why not drop a link on the menu to their latest laptop. This way a user searching for the newest laptop does not have to go in your whole laptop category. You should consider using products or services on the menu.
- The Search Engine Perspective
The dropdown menu in your WordPress website is not just for organizing content and help the visitors to access vital categories easily. But also you are providing a huge amount of information to search engines. With the help of a navigation menu, a search engine crawl bot can better figure out what your site is about and what you are offering? So the navigation menu has some value from the SEO perspective.
- Readability
Of course, one of the points you must take care of. If you are using unreliable hard to read fonts, the user may disappoint from your site. Also, make sure the font, its size and icons you are using displaying fine on computers as well as mobile devices.
- Use WordPress ‘Live Preview’ mode
I explain this in Method 2 on how to create a dropdown menu in WordPress using Live Preview. To launch Live Preview, go to Appearances > Customize. The beauty of ‘Live Preview’ that it is a side by side mode, which means while you are making changes in ‘Menu’ (left side), while you can see those changes on the right side.
- Use call to action button
You are maintaining your site to convince the visitors so that they perform a certain action like buy, subscribe for newsletter or donate. So why not make it simpler for your visitor to take that specific action. For this, you can put an action button on the menu.
![]()
- Create Multiple dropdown menus
Don’t try to put all of your balls in one basket. Instead of adding all the sub-items under a single top link, you can create multiple dropdown menus under top links in your menu.
If you think there will be like 5 to 10 subitems under a single top link, then make use of Mega Menu. I already discuss Mega Menu above that make the large dropdown menus more attractive and professional looking.
Summary
That’s all. After going through this tutorial, I hope you know how to create a dropdown menu in WordPress easily. I also mention the common mistakes and tips to improve your navigation menu so you can create an effective dropdown menu.
If this guide is beneficial for you, don’t forget to drop a comment below and keep visiting the site for new WordPress tutorials.
Have a nice day.