If you are looking for a step-by-step easy guide on how to create a backup of your WordPress website this guide will explain to you why backups are so crucial and different ways to create backups.
Creating backups is essential regardless of the type of website (whether a small personal blog a business website). In this guide, I will explain different aspects of backups alongside how you can create WordPress site backup using a plugin UpdraftPlus as well as without a plugin.
What I am going to cover in this ultimate guide
Quick Navigation- What is backing up your WordPress websites and its importance?
- What is the meaning of Full Site backup and what items it should include?
- What are the Types of WordPress site backups?
- How to backup a WordPress website using a plugin?
- 3 ways on how to back up the WordPress website without a plugin?
- FAQ’s
- Summary
What is the meaning of backup and why is it so essential?
In simple words, a backup is a copy of your website with the purpose to save all the work so that you can easily get it back when your site faces data failure or major hacking attack. It includes backing up your WordPress website content which comprises media files, pages, posts, plugins, comments, and themes, etc.
The foremost benefit for enabling backup that it plays the role of a strong defense line for protecting your site data. So when a hacking attack or malware hit your website badly then the easy way to get it back in a working position as it was before is to restore a backup. Luckily for backup creation and restoration, you don’t need to learn any rocket science all you need to hit a few clicks using a plugin and there you go.
Although creating backups is essential but you must also create more than one copy and store them in more than one place. Like you can save backups on Google drive, dropbox, any separate server or on your portable storage drive.
What is the meaning of Full Site backup and what items it should include?
Before I move to the guide that how you can make a backup of your WordPress website, it is significant to know what items should include in the backup. This information is important because it enables you to understand the backup plugin settings and also when you want to create a manual backup.
Your website mainly consists of your website files and databases. For a complete site backup, it means you need to create the backups including website site files and database.
Website Files
- WordPress core files: These are the files that you get when you download WordPress.
- Images, videos: It consists of the files that you uploaded and usually use in your posts and pages, etc.
- WordPress Plugins: Plugins are the beauty of WordPress. It enables the user to add extra functionality without getting your hands dirty with coding. It is placed inside the wp-content folder.
- Themes: It makes your website appearance design i.e. its look. Using a theme you can customize your website layout and can access various other functionalities.
- CSS, JS, PHP, and other codes: These also play roles in designing and display web pages. These also use to add functionalities on your website as well as making its appearance beautiful.
While creating backup you should not just think about WordPress plugin and theme (both folders found in wp-content folder) but what I strongly encourage you to include ALL Parts (website files + database) of your website. Because when something happened to your website and you want to restore you don’t desire to restore its just theme and plugin and wasting your time on figuring out what is missing.
WordPress Database
As I said before it is always wise to create a full site backup that not just includes your WordPress website content but also database tables.
Your website files that we discussed above do not contain things like posts, pages, and comments, etc. So in order to create a complete backup, you must include MySQL database in the backup.
MySQL database contains data like pages, posts, comments, and categories, etc.
Don’t be confused about how you are going to do it just relax as it is a pretty easy process to create a complete backup of your WordPress website.
So if you just backup your website files then it will be just theme and plugins etc. that means there are no posts, pages, and comments. On the other hand, if you backed up just database then it only includes posts, pages, categories, and comments, etc. and you will not have your theme, appearance, and layout.
What are the Types of WordPress site backups?
Backups are generally of two types
- Onsite backup
Onsite backups as the name signifies are stored at the place that is in your immediate access or we can say at your place. Onsite backups are kept on your server where you are hosting your website.
The major benefits of onsite backup that you can immediately access the files and also you don’t have to pay any amount because you can save a backup on the same laptop/desktop which you are using.
- Offsite Backup
Offsite backup is an ideal type of backup. It involves storing the backup on a remote location that is securing data on a different location than the same server you are using for hosting your website. It is usually referred to as cloud storage like Google drive, dropbox or a separate server.
The major benefits of offsite backups include accessing the data from any location all you need internet and a computer. Additionally, it ensures greater security because if your site gets attacked by hackers or virus your backup is secure because it is on the other server.
I hope at this point you have a complete understanding of what is meant by a complete website backup and types of backups. Now let’s move to the steps on how to create a complete backup of your WordPress website.
How to Create a WordPress Website Backup for free using Plugin?
For creating a free backup, first of all, you need to install a plugin.
Login to your WordPress dashboard and then navigate to Plugins >> Add New.

Then search for UpdraftPlus in the search bar. Install and Activate the “UpdraftPlus WordPress Backup Plugin”.
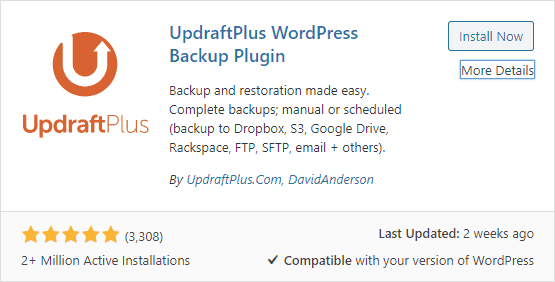
Once you have installed and activate the plugin next you need to do its settings.
Configuring UpdraftPlus settings to create a backup of your website for free
Upon plugin activation, go to Settings > UpdraftPlus Backups.
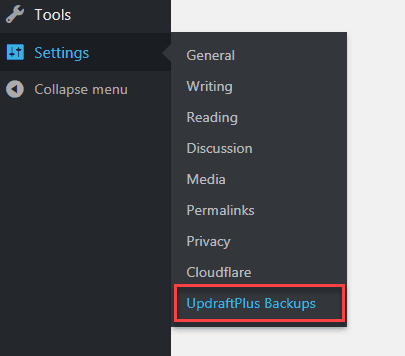
The beauty of Updraftplus that I really admire is its ease of doing setting. Now head over the “Settings” tab as shown below
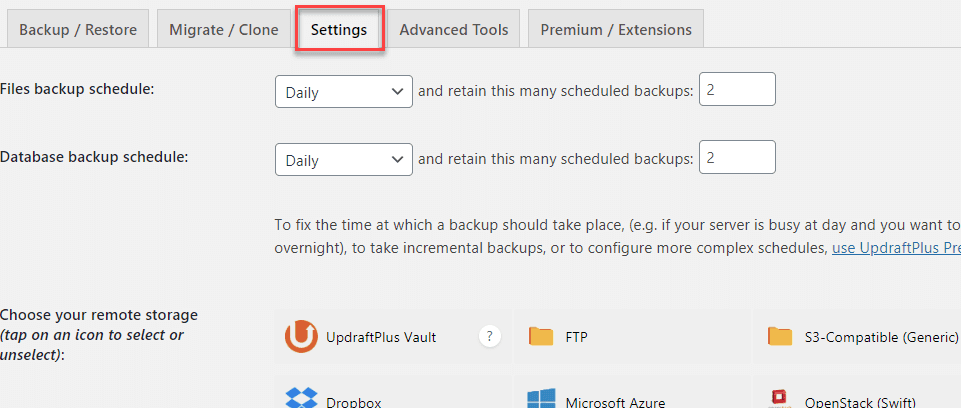
In this tab, you can schedule the backup i.e. automatic backups, select where the backup should store and what files to include in backups.
- Here at first, you can choose how often the plugin creates a backup of your website files and database. You can set this setting to
- Every 2, 4, 8 or 12 hour
- Daily
- Weekly
- Fortnightly
- Monthly
It totally depends on your choice. What I recommend if you update content on your site on daily basis then daily backups setting will be good while if you are posting content on weekly basis then selecting a weekly automatic setting will be enough for you.
- Next, UpdraftPlus allows you to choose the number of backups copies you want to keep. For example, if you choose 3 copies to retain then the 4th backup will replace the older backup. This is good because the newer backup files automatically replace the older ones so you don’t need to remove them manually.

Once you are satisfied with the setting, scroll down a little bit to configure the remote storage i.e. where your backups will store.
So it’s up to you what free storage option you use to store your backup files. Below I explained how you can authenticate UpdraftPlus with Google Drive and Dropbox to use them as free storage.
Remember as a free user you can only use 1 remote storage location.
Free Option 1: Choose your remote storage (Google Drive)
UpdraftPlus includes tons of options for you to select as a remote storage location. You can choose from UpdraftPlus Vault, Google Cloud, Microsoft Azure, Google Drive, Dropbox and many more. As here I am talking about creating a backup of your WordPress website for free so I will explain how you can link free storage options like Google Drive, and Dropbox.
So let’s start with Google drive which is known as one of the trusted and secured places to store data. The best part that Google Drive provides you 15GB storage for free.
How to link UpdraftPlus backup plugin with Google Drive for storing backups?
So first of all click on Google Drive.
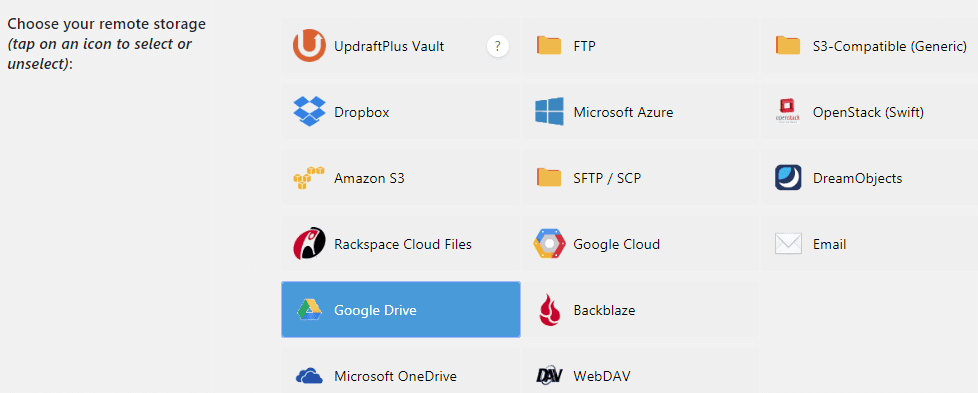
After selecting Google drive scroll down you need to Authenticate UdraftPlus with Google but before that, you need to select what should include in backups files.
All you need to make sure you check Plugins, Themes, and Uploads to include in backup files.
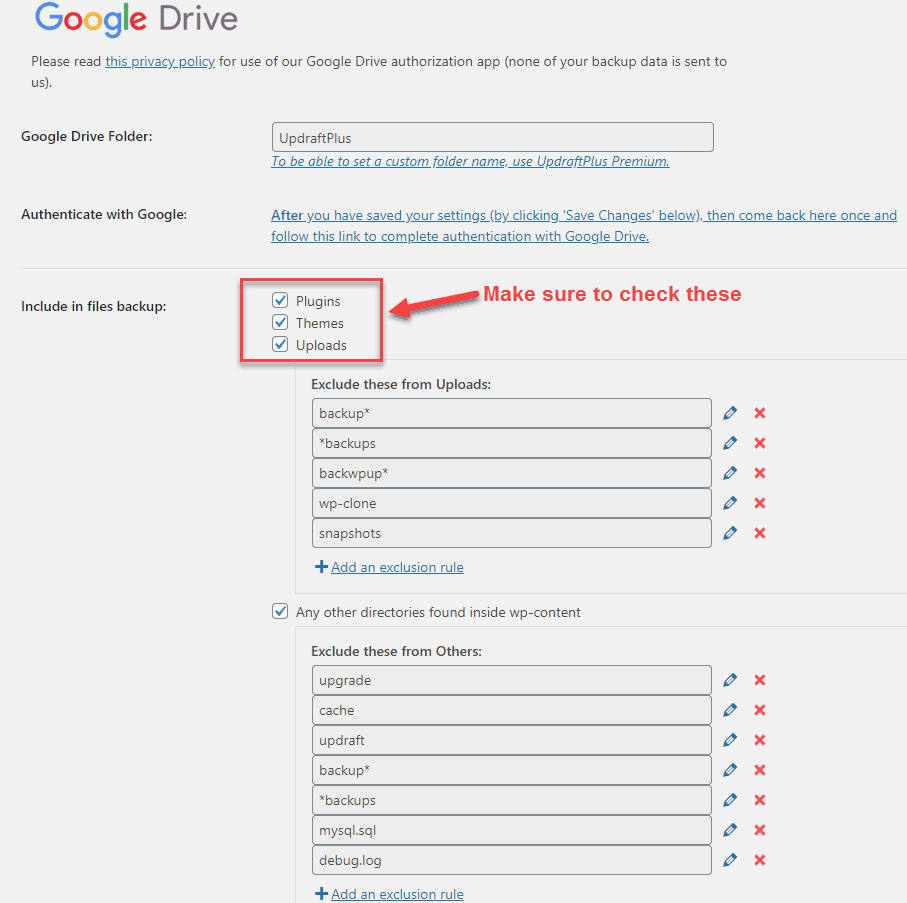
Nothing else here just scroll down and you will see Email heading. Check this box if you want to receive backup reports like is the backup successfully done or not right in your email inbox.
And then hit on the “Save Changes” button.
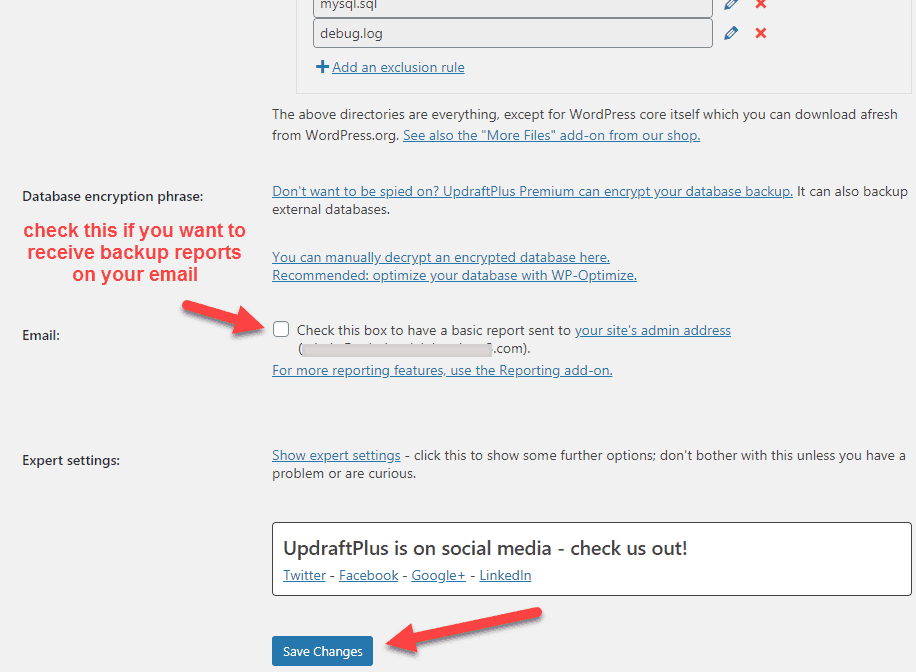
Now as I describe earlier you need to link Google Drive with UpdraftPlus to authenticate the plugin with Google.
Mostly UpdraftPlus automatically show a popup with a link after saving changes however if not then scroll up and find “Authenticate with Google”. Click the link shown next to it.

A popup will appear with a link. Go ahead click on it.

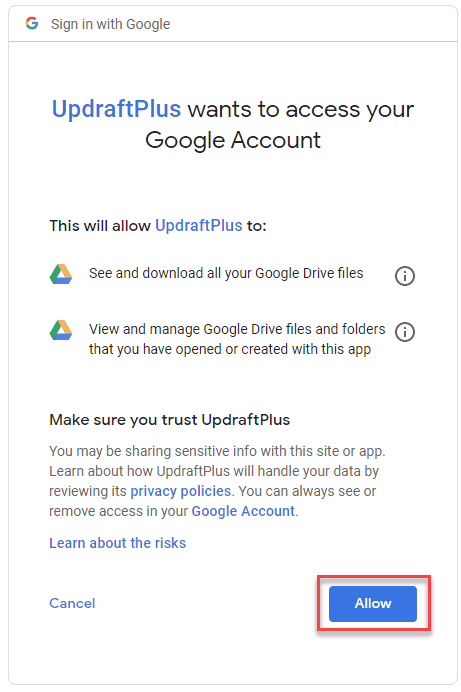
Next, you will be asked to Sign in to your Google Account. Then they need you to allow some permissions to UpdraftPlus. Simply click on the Allow button.
The next Windows that will appear asking you to click on “Complete setup”. And congratulation you have linked Google drive with UpdraftPlus to automatically store your WordPress website backups.
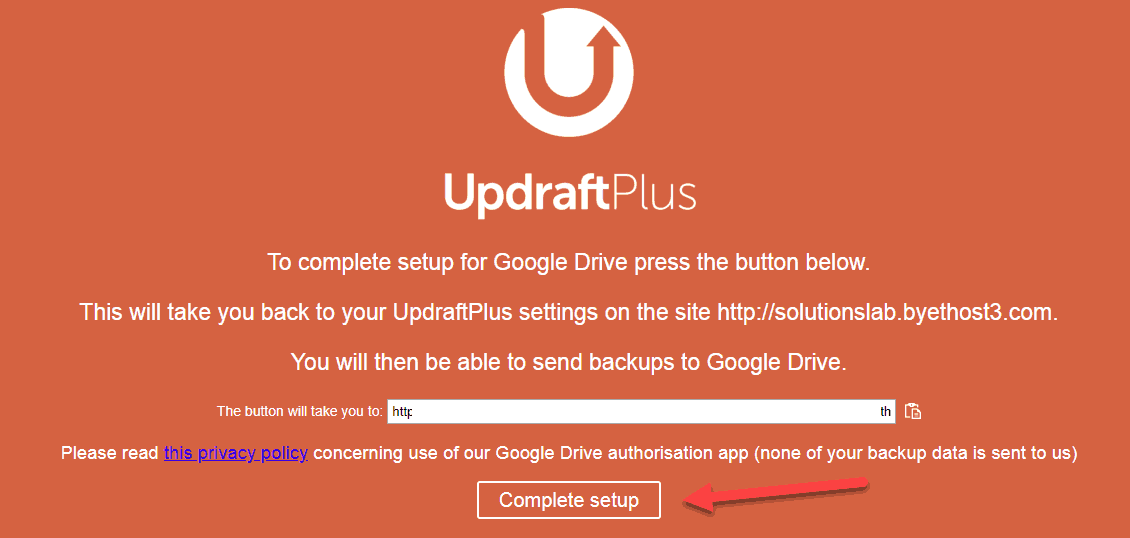
After clicking on the complete setup they will redirect back to your Updraftplus setting in WordPress dashboard.
Create Manual Backup (Optional)
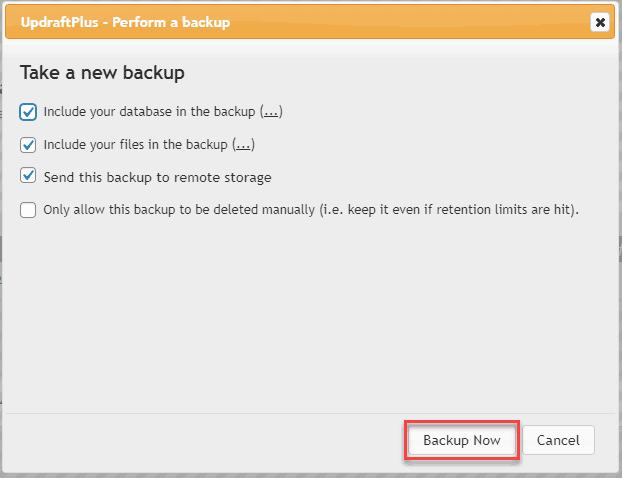
Here in the Backup / Restore tab, you can see the status of your backups. To create a manual backup simply click on the Backup Now button.

A popup will appear asking you to select files you want to include in the backup. By default, the setting is fine just make sure it includes your website files and database so that you will get a complete backup.
Then click on the Backup Now button. And there you go you can also see backup progress bar.
Downloading Backup Files to your local drive
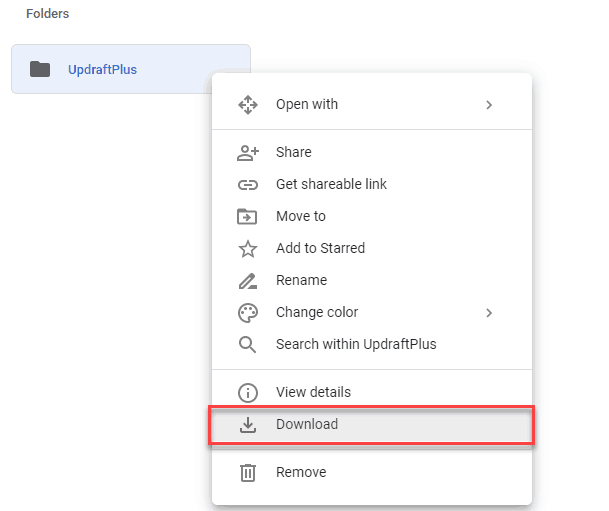
Storing backup files on Google Drive is pretty secure however if you want to be overcautious then you can easily download the backup files from Google Drive to your computer drive.
- Just login to your Google Drive account (where you stored backups), right click on the folder and then click on Download.
Free Option 2: Remote Storage for storing backups (Dropbox)
Although Google Drive is a reliable and trustworthy place for storing backups however if for some reason you don’t want to link UpdraftPlus with Google Drive then the next convenient option is to use Dropbox.
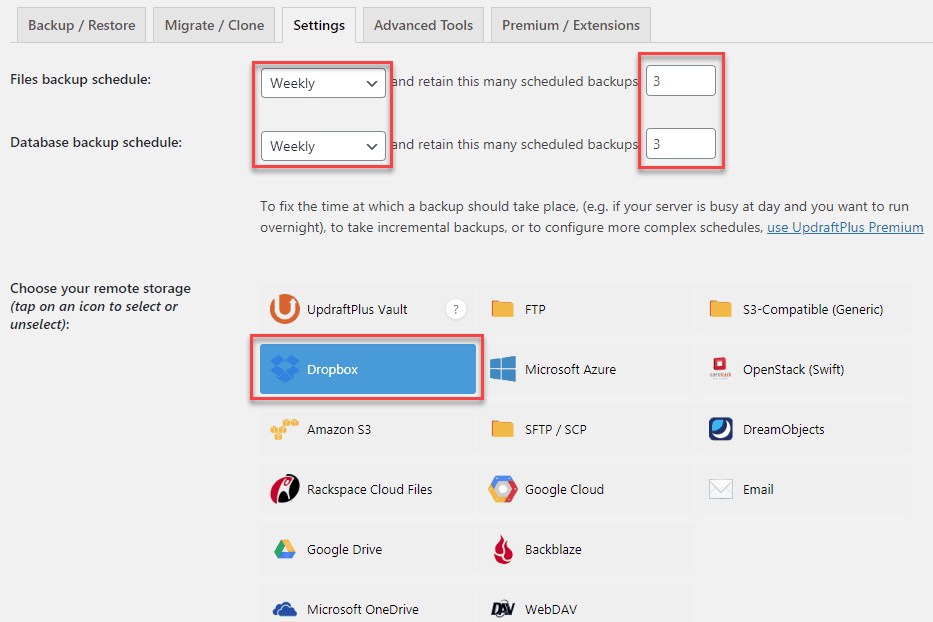
- Go into the Updraftplus setting tab and select when you want the plugin to do the automatic backup for your website files and database.
- Also, select the number of copies that you want to keep in your storage place. As mentioned before if you select like 3 copies then the 4th backup will replace the older one.
- For connecting with Dropbox select the Dropbox option in the UpdraftPlus setting tab.
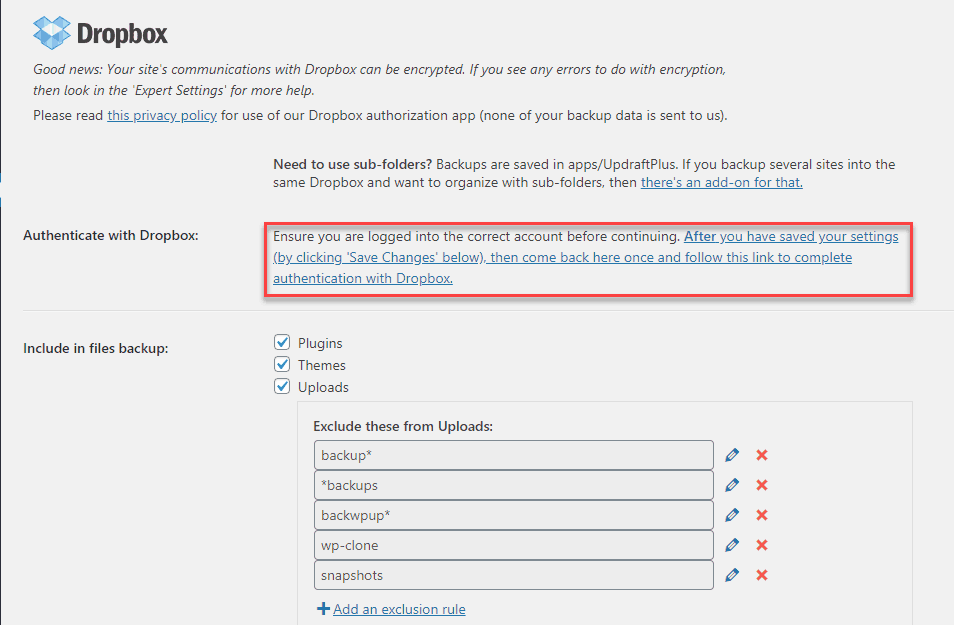
- By default Plugin, Themes and Uploads are checked to be included in the backups. Scroll down a little bit to just make sure.
- To authenticate UpdraftPlus with Dropbox just click on the link appear next to the “Authenticate with Dropbox” text (on the same UpdraftPlus Settings tab).
- After clicking they will lead you to a page asking you to sign in to your Dropbox account.
- As soon as you put in the details and click on Sign in button you will see a page asking you to click on the Complete setup button.
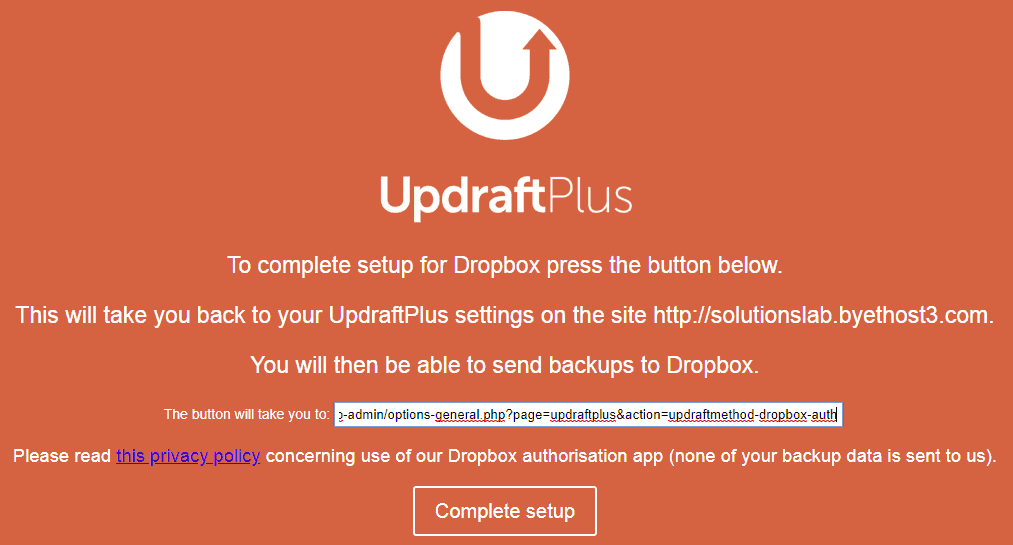
- After clicking they will lead you back to the UpdraftPlus configuration page.
- Here if you want to create a manual backup for your website then make sure you are in the Backup / Restore tab. Click on the Backup Now button.

The process will ask you what components you want to include in your backup for entire site backup make sure you check
- database
- website files
- send this backup to remote storage
Click on Backup Now and you will see manual backup creation in progress.
Restoring Backups
Creating backups of a WordPress website using UpdraftPlus is easy but the good thing restoring a backup is way much easier than creating.
For restoring backups stay on the same tab (Backup / Restore) and scroll down.
To restore a certain backup simply click on the Restore button.

After that, they will ask you to choose the components you want to restore. It comprises
- Plugins
- Themes
- Upload
- Others
- Database
If you select some specific components then the plugin will restore that specific component only. However, for full site restoration, you need to check all the options.

Hit the next button the restoration progress will start. After a few moments, your site or the components you selected will be restored.
3 Ways: how to backup the WordPress website without a plugin?
If you think your website has loads of plugins and you don’t want to install anymore then this approach may come to a handy solution. In my opinion, the fewer plugins you installed on your WordPress the better for your website.
There are multiple ways to manually create a backup of your WordPress website without a plugin.
Option 1: Automatic Backups
A fewer number of hosting companies include free automatic backups. Just take the example of SiteGround, their most basic StartUP plan offers free automated daily backups. The best part they store on separate storage (Offsite) and kept 30 days backups which means you can restore your website to 30-days back.
However, keep in mind usually free backup that comes with basic plans also joint with some limitations. Like SiteGround free daily backups are just automated that means you can’t do a manual backup. This is problematic because when you have done lots of changes to your website design, pages and posts and you want to run a backup but with the free daily backup, you can’t do so.
On the other hand, most companies on their higher-tier plans include advanced backups without or with small additional cost. Like SiteGround includes free advanced backups in their GrowBig and GoGeek plans. These advanced backups provide you more control so you can perform manual backup whenever you want.
Just like SiteGround some of the other premium web hosting companies such as WPengine and Kisnta etc. include free backup with their hosting plans. So what I suggest while purchasing a web hosting account look at the plan details or contact their support team (almost every company offers live chat) and get to know is their hosting plan included with free backup service and whether you are allowed to create both manual and automatic backups.
The purpose is while operating online you need to keep as secure your website as possible. So don’t just rely on just an automatic facility.
Option 2: Manual Backups Through the cPanel
Out of all the hosting companies, most of them offer a cPanel (control panel) with their hosting services. The reason behind that it is enormously easy to learn even for beginners. So let’s start
- Login to your cPanel.
- A cPanel consists of various sections. Here you just need to search for Backup Wizard which usually appears under the Files Click on it.

After clicking a simple 3-step Backup Wizard will appear on your screen.
Step 1 (Back Up or Restore): Go ahead click on Back Up.

Step 2 (Full or Partial Backup): Here don’t be hurry. The Backup wizard offers you two types of backups Full or Partial. Let me explain it because it is essential to understand.
- Full Backup: It is used only when you want to move from your existing web host to another. It cannot be restored on the same web host.
- Partial Backup: It is used to restore your website when it is affected by some vulnerabilities and you don’t want to move your web host.
As I am discussing the backups to fix your website in the case when it is infected by malware or hacking attack so Partial Backup is the way to go for.

In Partial Backup, there are 3 components that you need to back up.
- Home Directory: Contain themes, plugins, and uploads.
- MySQL Databases: Contain posts, pages, comments.
- Email Forwards & Filters: the name explains itself.
Step 3 (Download): it’s time to download the backup files on your computer.
Here note that you can’t download all three components at once. It means you need to save them one by one.
So go ahead click on Home Directory, Provide the location where you want to save the file on your directory and download it. Similarly, download the other 2 components (MySQL and Email forwarders & Filters).
Tip: To be extra careful I recommend you to save the backup files in your external hard drive which you do not use for your usual purposes.
Now as you have created and downloaded the backup files, of course, you also need to know how easily you can restore it at the time of need.
How to Restore the WordPress Backup Files through cPanel?
Fortunately restoring backups through cPanel is enormously easy too.
- Login to your cPanel and click on the Backup Wizard as you did while creating the backup. Just like backing up, restoring also involves 3 steps.
Step 1(Back Up or Restore): Once you are in the backup wizard you will see a Restore button, click on it.
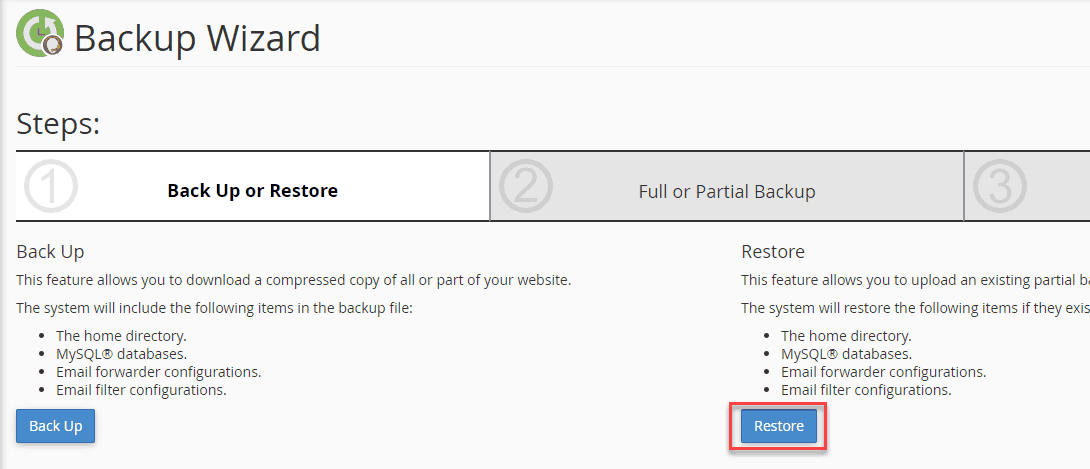
Step 2 (Select Restore type): Now if you want to do full site restoration including posts, pages, categories, comments, themes, plugins and so on then upload the home directory, MySQL and Email forwards files one by one.

The free backup and restoration process using cPanel is done and it’s pretty simple and fast. Right?
Option 3: Using File Manager and Phpmyadmin
It is a more manual approach than any other for creating a backup that is why I do not recommend it for beginners. However, it’s pretty simple to do backups as well as restoration using the combination of File Manager and phpMyAdmin.
Let’s begin
- Login to your cPanel provided by the hosting company.
- Search for File Manager usually displays under the Files section.

Now you will most probably see your website name on the left side while on the right side you will numerous files and folders.
- Find and click on public_html.
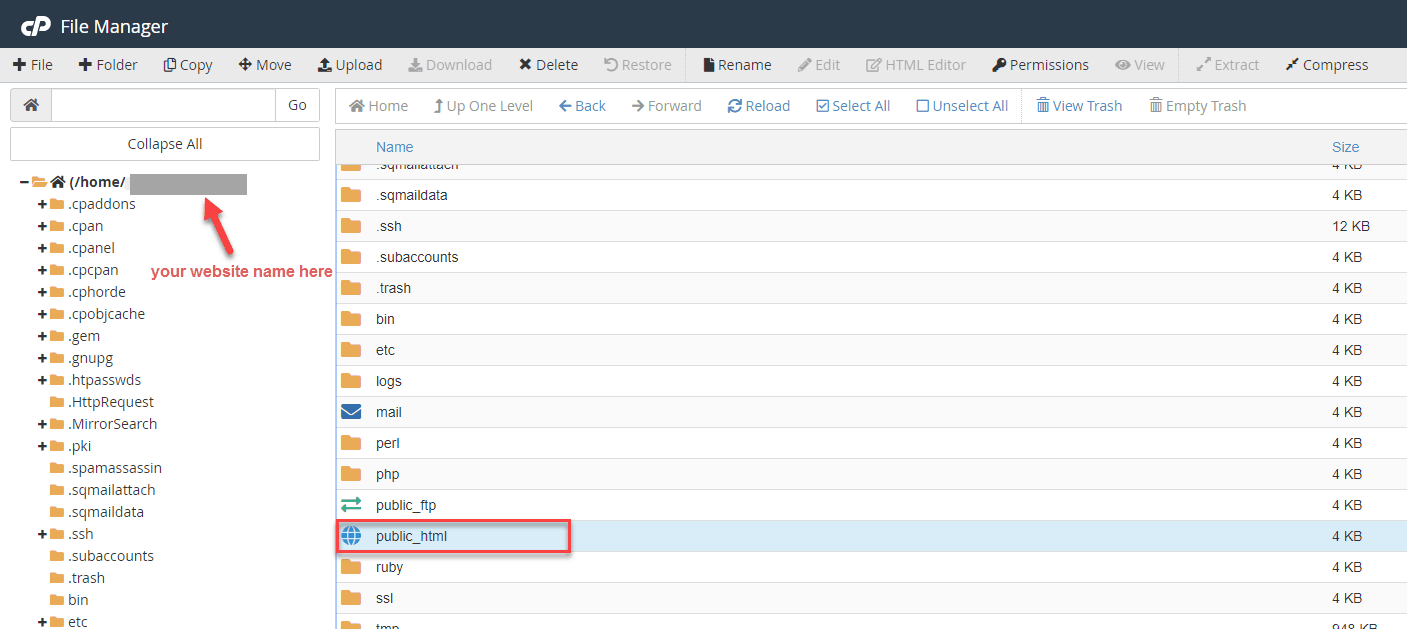
- Once you are inside public_html, you will see all of your website files (except database). Simply select all the files, right click and then click on Compress. It will create one zip file of your all website files.
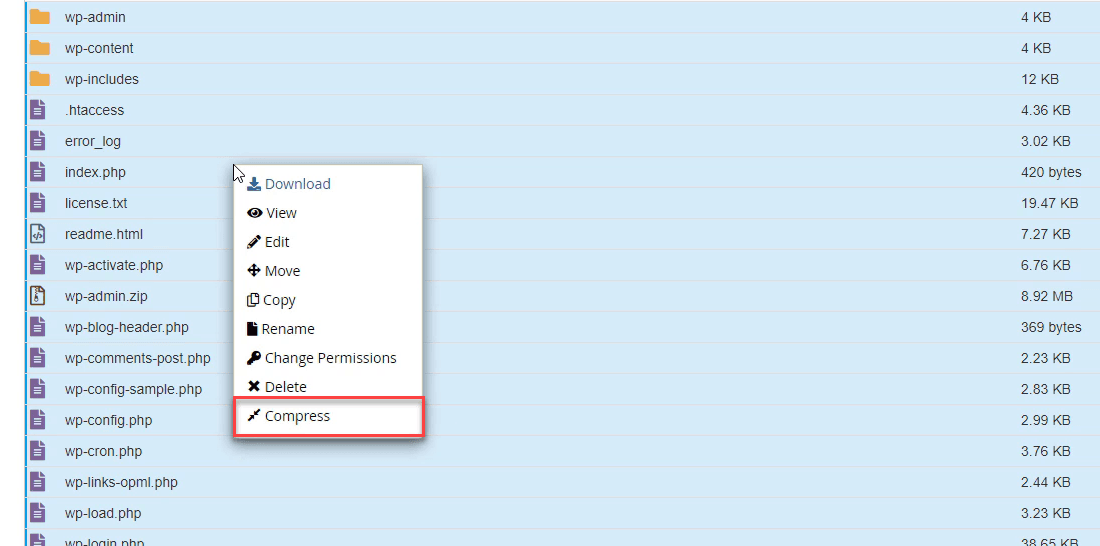
- After clicking compress a popup will appear where you can rename the zip file as well as can see the location where the zip will be created after the compression.
- After writing the desired name click on Compress File(s).
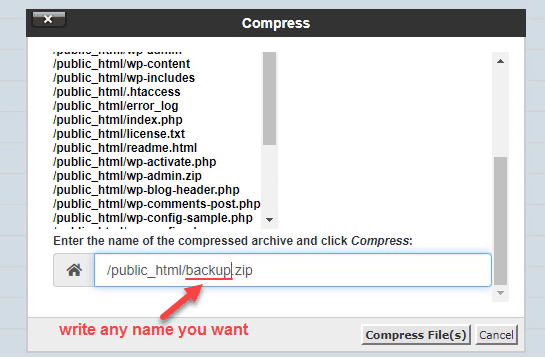
It will take some time to create a zip file. Once the progress is completed you can see the zip file in public_html directory.
- Like I named the zip file as “backup” so right click on it to “Download” it on your computer local drive.

- For backing up your database first you need to know the database name. So in the same public_html directory, you will find a wp-config.php file. Right click on it and click on View.
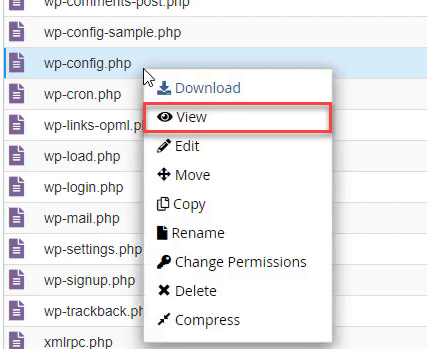
- A new browser window will open where you just need to find ‘DB_Name’ and there you can see the name of your website database. Nothing else here. Image below
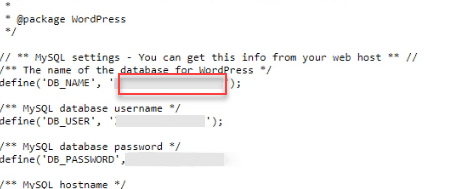
- After downloading the zip file and getting the database name you need to backup your database. So go to your cPanel, find and click on the phpMyAdmin.

- In a moment a database window will appear. Make sure you selected the database from the left column and then you will see many entries on the right side.
- Simply click on Export.

- Next, the system will ask you to select the Export method and format. Just go with default settings (i.e. Export method: quick and Format: SQL) and then click on the Go button.

- That’s it you have successfully backup your entire website using file manager and phpMyAdmin.
How to restore a backup using file manager and phpMyAdmin?
Restoring backup that you just created is very simple. You need to place the files from where you picked them that website files in public_html directory using the file manager and database file using phpMyAdmin.
- To restore back up, Log in to your cPanel.
- Find and open the File manager that you did while creating the backup.
- Find the public_html directory. Open it and upload the file zip that you downloaded before (while creating a backup). In the below image, you can see I am inside public_html and then upload the zip file.

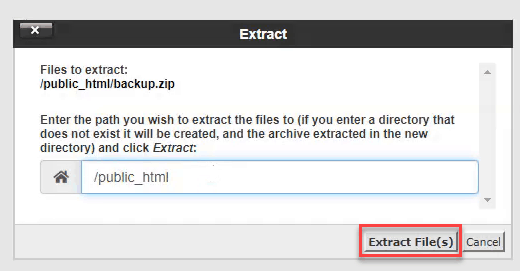
- Once the file is uploaded, right click on it and Extract.
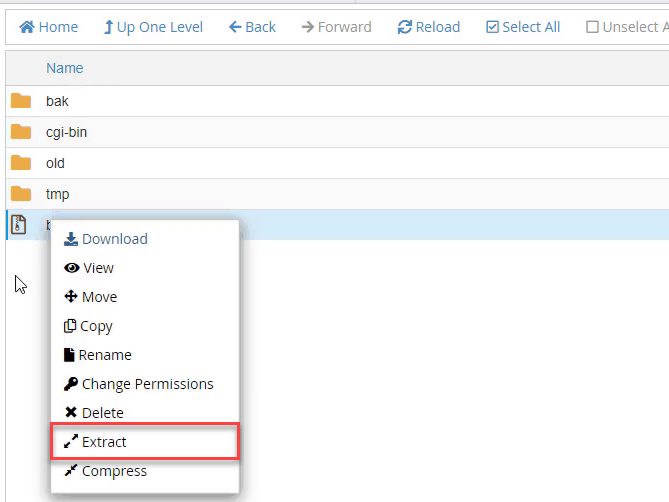
- A popup will appear with a location where you are going to extract the files (it should be /public_html). Leave it as it is, just click on Extract File(s).
- The final step is to upload the database file. So again go to your cPanel find and go to phpMyAdmin.
- Select the database name from the left column. And then click on Import.

- On the next page, just choose your file and leave the other setting default and click on Go.
Once your system has finished database file importing you will see a success message. That’s it you have successfully restored the backup using File manager and phpMyadmin.
Frequently Asked Questions
How frequently you should perform backup manually?
It totally depends on you. What I suggest that whenever you make big changes to your website or some important changes feel free and do a manual backup.
The good thing either you are using a plugin or not creating a manual backup of your WordPress website is super-duper easy. Especially when using a plugin or a backup tool provided by hosting company. You just need to hit almost 2 to 3 clicks and the manual is done.
Why use a paid backup plugin if there are good free backup/restoration plugins?
Many people wondering why to invest in backup plugins such as premium UpdraftPlus, VaultPress or BackupBuddy particularly when there are free good and reliable plugins like UpdraftPlus out there.
There is nothing wrong with using a free backup plugin. However, if you want company support services then paid plugin is the way to go for. That support team helps you out in solving all your queries regarding backups, restoration, and any other plugin exclusive feature.
Furthermore, the company provides you storage place with a paid plugin. That storage place is specifically designed to keep your backups secure.
For a plugin like UpdraftPlus, where a free user can only use one remote storage location, the paid user can attach more than one remote storage location which, of course, ensures more security.
Yes, free backups are good but it’s worth to invest in a premium backup service.
How many backups should I keep?
If you ask me I keep around 3 – 4 recent full site (website files + database) automatic backups. It totally up to you. There is no need to store a backup that you made like 6 or 3 months ago.
However, if you are too busy and not checking your site status every day then keeping a 2 week or 3 weeks older backup is a clever move. as you are not checking your website and something bad happens to your website. The automatic backup will create a copy including the malware then restoring a 2 week older backup file that you think free from malicious thing will be a good and quick solution for you to keep everything online.
Summary
There is no doubt that backups are the most essential part of every website which adds peace of mind security to your data. Thanks to plugins which makes it a lot easier for beginners to stay focus on their website instead of playing around the website security.
In the above guide, I provide an in-depth tutorial on how you can create a backup of your website for free using a plugin like UpdraftPlus. I also describe 3 different ways to create backups if you don’t want to use a backup plugin.
What I suggest, don’t sleep on this if you are not creating backups of your website dot take unnecessary risks. I hope this ultimate guide helped you a lot whether you want to do automated or manual backups. Leave a comment below about your thoughts. Have a nice day.