If you are going to start a new website, you may hear a lot about WordPress, the most popular content management system, the best flexible CMS for building almost all types of sites, and like that. Alone WordPress covers a significant 34% portion on the internet that powers websites. The major reason behind its popularity that everyone can easily create websites using WordPress.
So if you decided on WordPress for creating your website, the first confusion you may encounter that where to start?
So first of all, what I want to say, feel no worry. It is a simple process, and everyone can learn it. You will learn how to install WordPress using different one-click installers and how to install it manually on a web server. There are multiple script installers like Softaculous, Fantastico, and Mojo Marketplace that come with the control panel provided by a hosting company. I will provide tutorials related to each of them so you can easily install WordPress on every hosting provider. I will also show you how to install WordPress on your local computer.
What I want to say, by the end of this guide, you will become Pro for WordPress installation and get knowledge of all the means of installing WordPress.
Below is what you will learn after going through the tutorial.
- What is and how to install WordPress by using One-click Installer?
- How to Install WordPress using Softaculous
- How to Install WordPress using Mojo Marketplace
- How to Install WordPress using Fantastico
- How to Install WordPress Manually Using FTP
- How to install WordPress in Your Computer (Windows & Linux)
- How to Install WordPress in Your Desired Language
- How to Install WordPress Multisite Network
- My Recommended WordPress Hosting Providers
Ok, now fasten your seat belt here we go.
How to Install WordPress with One-Click Installers
As I mentioned above, there are many Script Installers like Softaculous, Mojo Marketplace, and Fantastico, etc. which makes WordPress installation super effortless so great for beginners. All you just need to hit a few clicks, and here you go, it’s done. So here, I will cover the popular script installer that is usually offered by most hosting companies.
How to Install WordPress using Softaculous
Softaculous is a famous and my favorite script auto-installer. It allows you to install tons of web applications with just a matter of a few clicks, including WordPress. Most hosting providers like SiteGround provides Softaculous installer in their hosting control panel. So how to use it.
-
- First of all, just login to the cPanel provided by the hosting company. You find the login credentials in the email sent by the hosting company when you purchased their plan.
- Now just scroll down and find the name It usually locates under the Software tab of cPanel. Some companies may even provide you a separate Softaculous App Installer tab.
![]()
- Simply launch the Softaculous App Installer by clicking on it.
- From the next window, search for WordPress. As it is a popular application, it is usually placed at a prominent location under the Top Scripts tab. If for you, it’s not there; just click on the Blog from the left sidebar.
- Hover your mouse cursor over WordPress and hit on Install or simply click on WordPress.
![]()
- Just make sure you are in the WordPress install tab. The setup now asks you to put in some details.
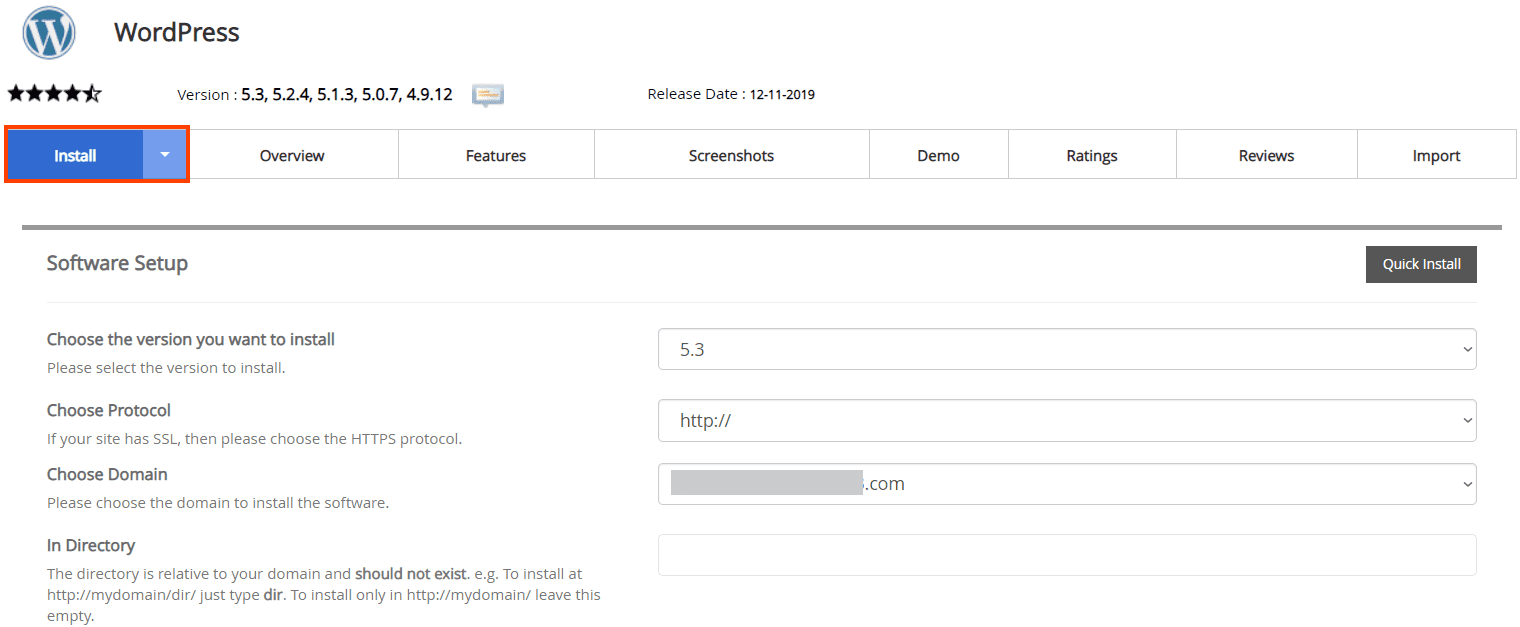
Protocol: If your site has an SSL certificate, then Choose Https:// otherwise select http:// as protocol. As now most hosting providers offer free SSL certificate like SiteGround, in that case, go for Https://
Choose Domain: Select your domain name
In Directory: Where you want to install WordPress. In simple words, if you want to locate WordPress under ‘www.yourdomain.com’ the leave this field blank. However, if you want to locate it under ‘www.yourdomain.com/wp’ then just put wp in this field.
- Scroll down a little bit to fill in further details.
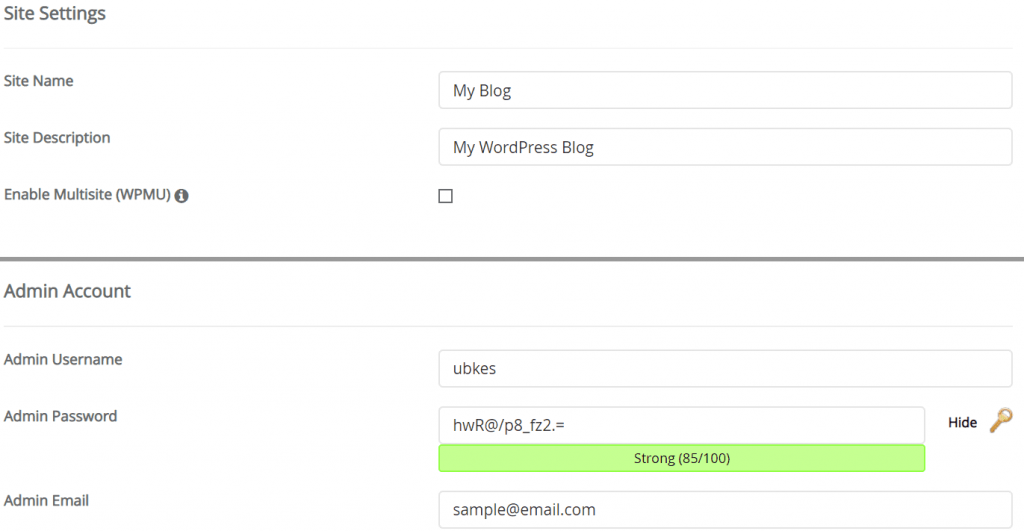
Site Name & Description: Type your website name and a short description for your website. However, you can also change it after installing WordPress.
Enable Multisite (WPMU): This feature allows you to run and manage multiple WordPress sites from a single dashboard. If you have any intent to make use of this feature in the distant future, then simply ignore it.
Admin Username & Password: This is the most crucial section – never use the default admin as your username for security reasons. For password, either type the password or generate it using a key near it. The more complex password ensures high security and difficult to hack.
Admin Email: This field is obvious type your correct email. You will WordPress notification and password reset link whenever you forgot the WordPress password.
- WordPress is a multilingual CMS, so select your preferred language from the list.

- Rest of the setting is optional; however, I recommend you to check “Limit Login Attempts”.
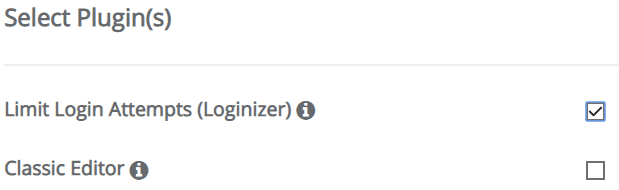
This feature limit login attempts, so an essential feature from the security side. You can invalidate the access for a particular IP address after a certain number of failed attempts.
- Now click on the Install The installation takes a couple of minutes. Just let the progress bar reach 100%.
- After successful installation, you will receive a Congratulation message from Softaculous.

- The work is done. Installation is successful; just copy the Administrative URL, which you need to put in browser to access the WordPress dashboard.
How to Install WordPress using Mojo Marketplace
Here is another easy to use 1-click installer that your hosting provider may provide you in the cPanel. Just like Softaculous, Mojo Marketplace is super, duper easy to use that requires no prior skills.
Among the various companies, Bluehost is one of the popular web hosts that is offering Mojo Marketplace 1-click installer in their control panel.
At first step, you need to login to your cPanel provided by the hosting company. Find the Mojo Marketplace and then the One-click install button.
As Bluehost is using Mojo Marketplace, let’s take it for the tutorial.
How to Install WordPress on Bluehost using Mojo Marketplace
Select Blogs & Website Builders in the Mojo Marketplace sidebar so that you can easily spot the WordPress. Click on the icon to launch the installation procedure. From the next screen, click on the Get Started button.
Hit the Install button.

Now you need to select a domain name you want to install WordPress on. You need to select a directory using the mojo installer. If you want to install WordPress in domain’s root directory like www.yourdomain.com then leave it blank. Mostly user leaves the directory field empty.
Then hit the Check Domain button that will lead you to the last step.

In the next screen, check Show advanced options and type in the details like Site Name, Username, and Password.

- Admin Username: don’t use admin as username as it is easy to hack. Use a different name.
- Admin Password: As I mentioned before, never use simple, easy to hack passwords. Always use complex and special characters in your password, for example. gt5@/Wh_rA.
Make sure you have checked Automatically create a new database and terms and condition box.
Then click “Install Now”
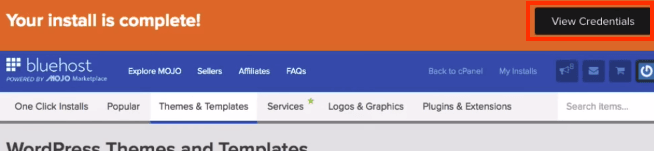
You can see WordPress installation progress at the top of the page.
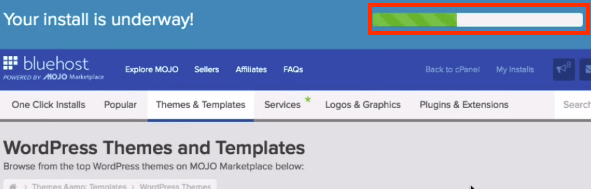
Once your install is complete, click on View Credentials, where you will get your site URL, admin URL, username, and password required to access the WordPress dashboard. So make sure to save these credentials in notepad.
How to Install WordPress using Fantastico
Fantastico, just like its name, is a Fantastic installer that enables the user to install WordPress quickly. In a matter of a few steps, you can install WordPress on a fresh hosting account.
First thing first, login to your cPanel and search for the Fantastico F3, which is usually available under the Software tab. Do not worry if you are looking at a different Fantastico on your host because steps are almost the same, and you require the same information as I require in this case.
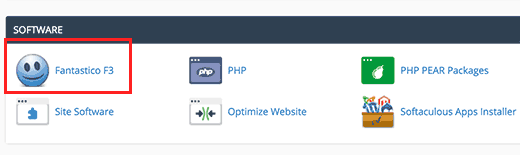
Click on the icon to access the Fantastico installer dashboard.
Now from the left side, click on Blogs and then find WordPress from the list of various other applications supported by Fantastico.
Click on WordPress; the screen will load up that provides you an overview of WordPress as well as whether your hosting meets WordPress requirements or not.
You don’t need to do anything just click on the “Click here to install” to proceed for the WordPress installation.

After clicking, Fantastico auto-installer for WordPress asks you to put in few details.

First of all, select your domain name where you want to install WordPress.
In the Directory field, if you want to install WordPress in the root directory that most users do, then leave this blank. However, if you want to make your site URL like www.example.com/wp then just type wp in the field.
Next portion asks you about Administrator Details. The details you put in this section use to login to the WordPress dashboard.
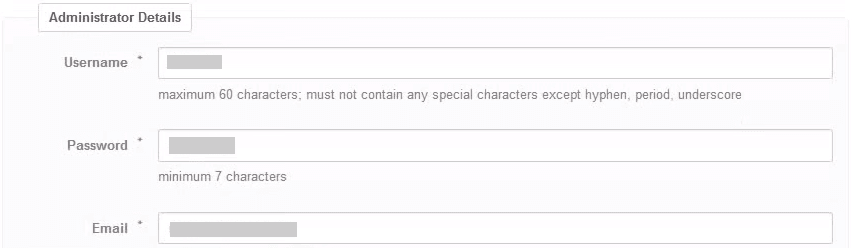
- As I mentioned earlier in Softaculous and Mojo Marketplace tutorial, do not use Username as admin – it is risky and easily hackable.
- Always create a complex password with the combination of capital and small letter, digits, and special characters like dots and brackets, etc.
- In the Email field, carefully type your working email address because it is the email address where WordPress sends you crucial information and password reset link when you use Forgot password.
The next section named Other Details.
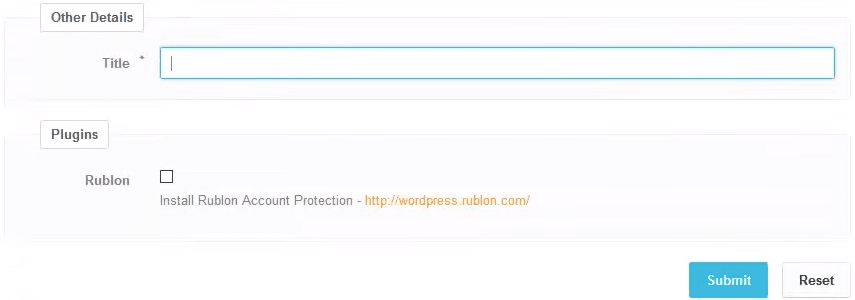
- Here just type the title of your website. Don’t worry; you can also change it later from the WordPress dashboard.
- Rublon is two-factor authentication, so if you want to implement an additional layer of security, you can check it otherwise leave it.
Hit on the Submit button. After that, click on Proceed, and Fantastico will begin the WordPress installation.
Once Fantastico has done WordPress installation, it presents you with backend credentials to access WordPress dashboard. So save these credentials.
How to Install WordPress Manually Using FTP, aka “The famous 5-min Installation?
If for some reason, you are encountering an issue while doing Automatic WordPress installation using Softaculous or any other one-click installer or just want to do it for fun, the manual WordPress installation is the way to go. The beauty of learning manual installation that enables you to install WordPress on any web host.
Aside from experience gain, knowledge about the manual process using FTP is exceedingly handy when you want to migrate your site from one hosting company to another.
The manual installation includes few added steps and requires an FTP client like FileZilla. FTP is a short form of File Transfer Protocol, which allows you to manually upload files from computer to your server.
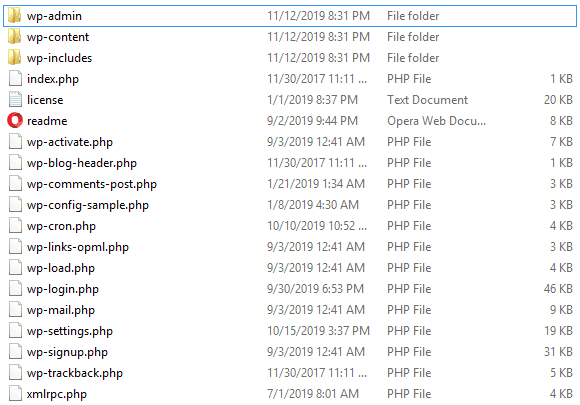
First of all, you need to download the desired version of WordPress on your local computer. WordPress comes in the form of a zip file. So go ahead and unzip it, you will get a folder named wordpress. This folder contains all the files that you are going to upload for a WordPress installation.
Upon downloading and unzipping WordPress, now you need to download an FTP client. There are various FTP clients, but I am going to use Filezilla, which is a popular client and enormously easy to operate.
Download and Install FileZilla on your computer.
Now connect your FTP client to your web server. In FTP client, select File –> Site Manager and create a new site.
You can find the required information like Host, User, and Password from your hosting cPanel control panel dashboard.
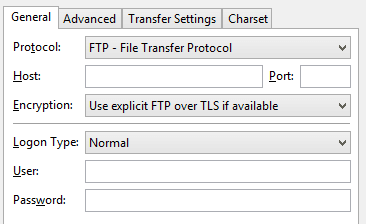
After putting the required credentials hit Connect.
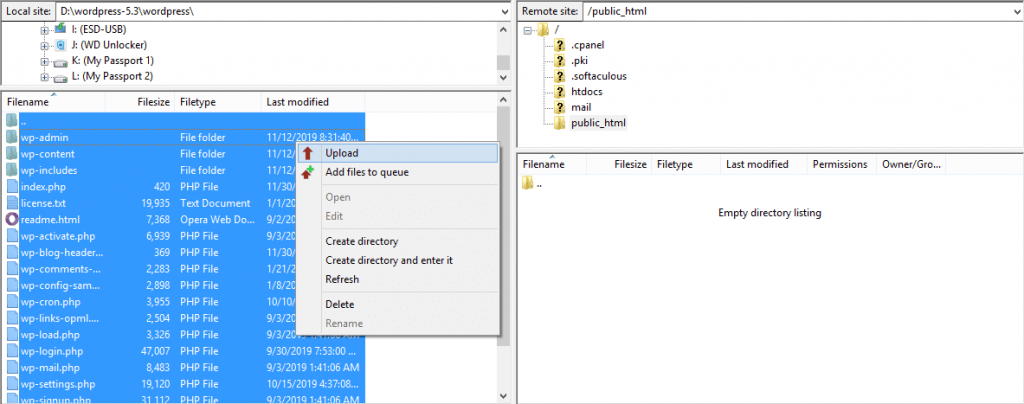
If you want to install WordPress in root directory like ‘www.yourdomain.com,’ then upload WordPress files /public_html/ directory.
On the other hand, if you want to install WordPress in a subfolder and want to make your domain like www.yourdomain.com/wp, then you need to upload all WordPress files in /public_html/wp/.
As most users install wordpress under the root domain directory, so I choose /public_html/ here.
After file uploading is done, now move to your cPanel provided by hosting the company to create a database.
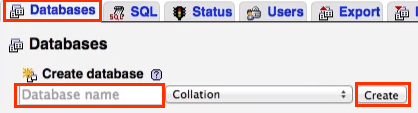
Rest your worries; it is an easy process. Regardless of what hosting company you’re using, just look for MySQL Databases.

You will see an empty filed to create a database. Simply type any name that you want to use and hit the Create Database button.
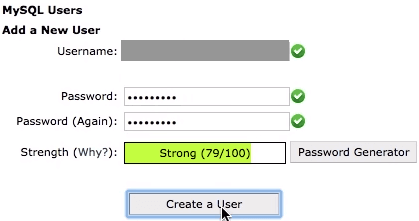
Once you have created a database, scroll down a little bit on the MySQL databases and fill the fields like user and password to create MySQL user, which is required for certain actions. After putting details, click on Create a User.
You just created a user, but the user does not have access to the database. So you need to provide permissions to the user, which you just created. For that, scroll down a little bit on the same MySQL database page.
You will see Add a User to a Database section. Just select the User and Database which you created and click on the Add button.
The system will now ask you Privileges that you want to provide to the user. Simply check ALL PRIVILEGES and click on the Make Changes button.
At this stage, your MySQL database and the user are ready. Just write the database name, MySQL username, and database as you need this information later.
You are now at the final step of the manual WordPress installation procedure.
If you want to upload your WordPress under the root directory (i.e./public_html), then just type yourdomain.com or www.yourdomain.com in your web browser address bar.
The process begins with the choice of language. Simply select your preferred language and click continue.
On the next page, there is nothing to do anything; it just contains instructions that what kind of information you need to progress through the coming process, so go ahead and click on Let’s go! Button.
The next step asks you to fill in database information like database name, username, password, and host. Click Submit.

After a successful WordPress connection with the database, it will show a message.
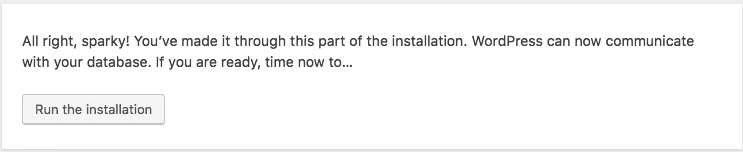
Feel free to hit Run the installation.
WordPress now automatically creates database tables, set values and load up the next screen where you need to put some basic details i.e. Site Title, Username, Password, and your email.
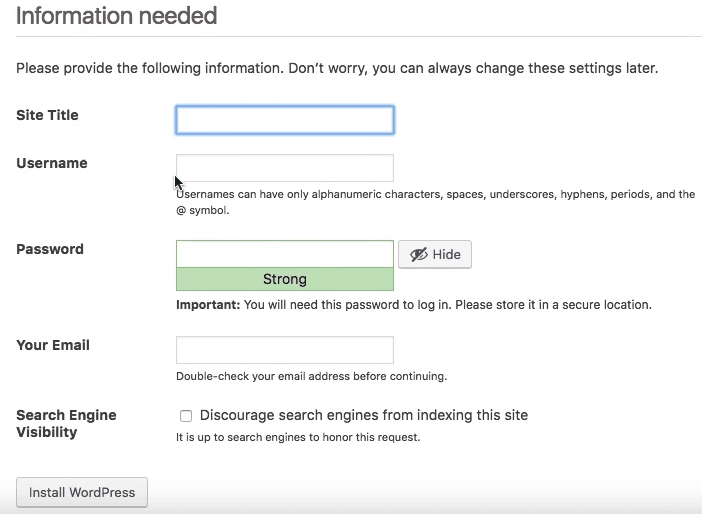
The information you put here is used to access WordPress dashboard, so note these down.
Click on Install WordPress, and there you go, the work is done.
The next page shows a success message and a Login button that leads you to WordPress backend dashboard.
How to install WordPress on Your Computer
By following any one of the above mentioned methods, you can install WordPress on a web server. However, there is also a way to install WordPress on your local computer which is good before actually investing in domain and web hosting.
Using this method, a beginner can learn WordPress while some folks use this to test out new things. However note that, if you are going to build a blog for other people to see, then you need to install WordPress on a web server. On the other hand, if you install on your local computer then only you can see it.
For installing WordPress on a local computer, you need WordPress and a small size software. For Windows, the software known as WAMP, and for Mac, you need a software named MAMP. I am going to discuss both one by one. It won’t take much of your time to learn this.
How to install WordPress on Your Computer using WAMP
So, first of all, go ahead, download, and run the WAMP setup. It is a straightforward setup; just go with default settings. Upon installation completion, go ahead and launch WAMP Server.
Before you move toward installing WordPress, just make sure your server is up. It is very easy to find. When you launch the WAMP server, its icon will appear in the taskbar.
If
- Red icon: it means you need to restart your PC or server because its services are not running.
- Orange icon: it means the server is booting or a few services are online. First, wait for it to turn into green, and after sometime if it does not, then restart the server.
- Green icon: the signal is green; you are good to go.
Now move your mouse cursor and click on the WAMP server icon in the taskbar notification area and then click on the localhost. Or simply type localhost in your browser.
In the next step, you need to create a database. For this, again, click on the WAMP icon and then phpMyAdmin. Type root in the username field and there is no need to type anything in the password field, so leave it blank.
Once you inside the phpMyAdmin, select Database tab.
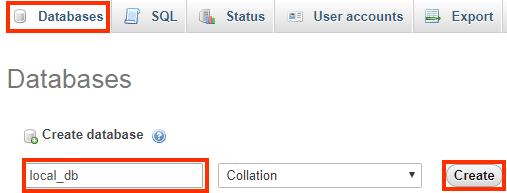
Just type the desired name for the database and click on Create. That’s it close phpMyAdmin its time to install WordPress.
Now go to WordPress.org website and download the desired version. It will come in the zip file, so go ahead unzip it.
Copy/Cut the WordPress folder that you get after extracting and paste it in the www folder, which you can find inside WAMP installation location. Like in my case I took the default location while installing WAMP, so I paste ‘wordpress’ folder into C:\wamp64\www
You can rename the ‘wordpress’ folder like mytestsite or anything you like. Quick tip, as it will become the part of URL, so use a name that is easy to remember. I will use demosite for the sake of the tutorial.
Now open web browser and go to http://localhost/demosite/
Here we go, you will see 1st step for installing WordPress that requires you to select language.
Next, just read instructions and hit Let’s go!.
The page will ask you to fill a few details such as
- Database Name: type the name that you use when creating a database. Like I used ‘local_db’
- Username: if you did nothing to this then just type default name which is root.
- Password: By default, there is no password so keep it blank
Leave other things as it is and click on the Submit button.
If a connection to the database established successfully, you will see a success message if it’s the case, go ahead and click on Run the installation.
It will take you to the next step, where you need to add a few things like Site Title, Username, and email address. When ready, click on Install WordPress button. WordPress will do all the installation processes in the background.
Once you see ‘Success!’ message, you now can proceed to the WordPress dashboard by clicking on Log in button.
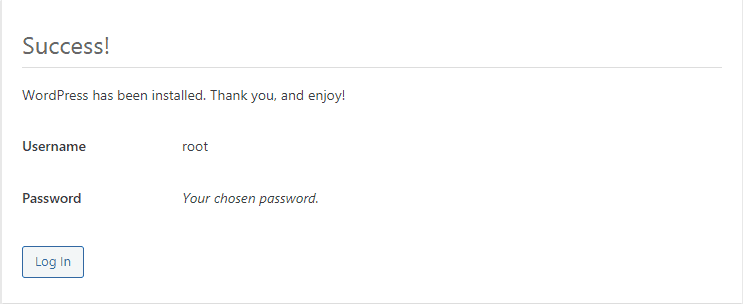
That’s it; you have done WordPress installation on Windows using WAMP.
How to install WordPress on Your Computer using MAMP
MAMP is a short form of Mac OS X, Apache the web server, MySQL the database management tool, and PHP a programming language.
First thing first, download MAMP and install it.
Launch the MAMP and click on Preferences.
Go to Ports tab and set port
- For apache set 80
- For MySQL set 3306
In the PHP tab, make sure you select the latest available version of PHP.
Start Servers
For installing WordPress using MAMP first you need to create a database. So go ahead and select ‘Tools’ from drop-down menu and then click on phpMyAdmin.
Select databases tab.
Type anything as Database name. e.g. wordpress and then click on Create. You are ready to install WordPress.
Download a fresh WordPress package from WordPress.org. As they always provide WordPress in the form of a zip file so extract it.
Now drag and drop the extracted folder to Applications/MAMP/htdocs. You can rename the ‘wordpress’ folder whatever you want. For the sake of simplicity, I did not change it.
In a browser go to http://localhost/wordpress
You will see the WordPress installation screen asking you to select the desired language.
Next, WordPress shows what information you are going to need to continue the installation. Here just click on Let’s go! button.
On the next screen fill the following fields
Database Name: you type when creating backup like I enter ‘wordpress’
Username: root (by default)
Password: root (by default)
You don’t need to touch any other field. Hit on Submit
If WordPress successfully gets connected to the database you get a success message.
Then Input details like Site Title, Username, and Password. Click Install WordPress.
Congratulations, you have done WordPress installation. You can now click on the ‘Log In’ button to access the WordPress dashboard.
How to Install WordPress in Your Language
This is the best part of WordPress that allows you to use WordPress in your desired language and make this platform more versatile. It supports plentiful languages including English, French, Urdu, Hindi, Chinese, Deutsch, Japanese, German and many more.
While installing WordPress, it shows a list of languages to choose from. However, You can also change the language using the WordPress dashboard.
For selecting your preferred language right from the WordPress dashboard. From the sidebar, just navigate to Settings –> General.
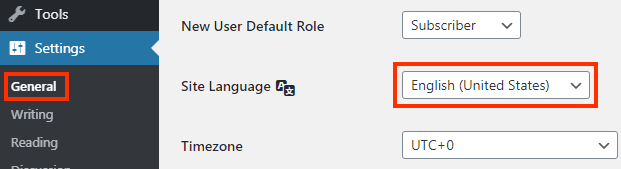
Use your desired language and have fun.
How to Install WordPress Multisite Network
If you are a beginner, you are wondering that What is WordPress Multisite Network? Well, you may not need it now but the high possibility you will looking for such a feature in some future time.
However, if you are still interested in creating a WordPress multisite network that how it can be a helpful feature for you, then go ahead.
What is WordPress Multisite Network?
It is a built-in feature in WordPress. It allows the user to create multiple WordPress sites using the same WordPress installation.
It is greatly useful for businesses, educational institutions, and blogs who need to run multiple WordPress sites but don’t want to get into the hassle of managing multiple WordPress dashboards.
Furthermore, you can apply a theme/plugin on multiple sites with a single download.
However, before you continue things you need to know as all websites install on the same server so you may require plentiful resources for using the multisite network, I recommend you to go away from shared hosting.
For a multisite network, using a VPS or dedicated server would be a good choice. For VPS, I recommend Bluehost, which offers shared, VPS and dedicated plans. They offer really cost-effective plans with stable performance.
If you need more choices, I recommend SiteGround and WP Engine; both are the name of quality. Both web hosts can run a multisite network smoothly.
SO let move to the real subject.
How to enable Multisite Network Feature?
There are multiple ways to enable multisite network.
- You can enable it while installing WordPress.
- If you have an existing site, simply navigate to cPanel and search for File Manager. Then open root folder (like if you installed WordPress on yourdomain.com) then go to /public_html. Edit wp-config.php file. Look for the /* That’s all, stop editing! Happy blogging. */ and add the below code before this line. wp-config.php is an important file, so I recommend you create a backup before editing it.
define( ‘WP_ALLOW_MULTISITE’, true );
3. Or using an FTP client, connect with your hosting account, and edit wp-config.php file.
WordPress multisite network can add new site using subdomains or subdirectories.
Sub-domains: if you want an address like site1.yourdomain.com
Sub-directories: if you want to install multisite site network in a subfolder like yourdomain.com/site1
If you choose a subdomain option, you need to do a little bit change with your web host, i.e. setup wildcard subdomain for the multisite network.
For this login to hosting control panel, locate and click on Subdomains.
In ‘Create a Subdomain’ section, just type Asterisk (*) in the empty filed, select your main domain and then hit Create button.
Head to WordPress dashboard and deactivate all plugins.
After this, In the WordPress dashboard, go to Tools –> Network setup and then select domain structure either sub-domains or sub-directories.
Make your selection, enter site title, and email address. Click on Install.
Then WordPress will show you codes to add in wp-config.php and htaccess file. You can find both files at the same location. I already discuss all the ways to edit wp-config.php file in ‘How to enable Multisite Network feature’ section.
Refresh or re-login to WordPress dashboard to make use of this cool multisite network.
At this stage, I am pretty sure you have learned how to install WordPress using automatic or manual processes.
My Recommended WordPress Hosting Providers
If you want to make your site available to everyone, then you need to install WordPress on a web server. You need to search for a web hosting company that offers all the essential features to set up WordPress. The good thing you don’t have to look at any in-depth technical assessment before choosing a WordPress. Fortunately, its requirements are pretty simple. You just need to look at the latest PHP version, a little bit of storage space, and MySQL databases. To make things simple for you, below I recommend some web hosts by keeping in mind WordPress requirements.
Bluehost:
Bluehost is among the top hosting companies powering over 2 million websites. Also, it is one of the recommended web hosts by WordPress. The shared hosting price tag starts at just $2.75/mo offer feature-rich plans who are looking to build websites effortlessly. You will be provided with enhanced cPanel that offer a 1-click installer to install WordPress. Each plan comes with a free SSL certificate.
If I talk about support services, honestly speaking, Bluehost needs to improve response time. However, they maintain all the standard ways like Live chat, Phone, and ticketing to contact their support team. They offer a pretty straightforward process to purchase both domain and hosting.
Bluehost offers 3 different tier of shared hosting, but once your needs go beyond shared hosting, you can go for their cost-effective VPS plans. Their managed hosting that is exclusively designed for WordPress comes with Automatic WordPress Installation.
SiteGround
SiteGround is a quality-focused hosting provider that is outperforming in all areas such as speed, uptime and support services. With the use of cutting edge technologies, SiteGround ensures stable services, which is why I am using their hosting for this blog. And what’s more, they offer plenty of rooms like managed WordPress, Cloud, and dedicated hosting to meet the needs of every type of user.
Luckily with such high-quality services, SiteGround still offering competitive pricing. Their pricing start at $3.95/month comes with all the essential features like SSD storage, Free SSL, latest PHP, and unlimited MySQL. While setting up the account, you can even choose the desired datacenter based on your targeted audience.
If you need help, you can contact their support department 24/7 using live chat, email, and phone. I am pretty sure you will not regret your decision if you pick a plan by considering your needs.
WPEngine
If money is not a problem for you, a managed WordPress hosting will be a hassle-free solution for you. WPEngine is a WordPress specialized hosting provider, which means you can only host WordPress using the WPEngine platform. The company offers you the best WordPress services as they are just dealing with WordPress for years.
Besides their top performance services, WPengine packages contain various useful things. All of their plans come with a well-known Genesis Framework with 35+ SutdioPress themes. The company makes available the latest PHP and SSL certificate. Alongside SSD, each plan comprises Global CDN to make sure the fastest loading time.
With just a price of $29/month, WPEngine lets you focus on your website by keeping aside all the technical worries and speed optimizations. They provide top-notch security and provide full assistance in the case of dangerous hacks like Bruteforce protection. On top of that, your money is protected by the 60-days refund policy.
Kinsta
Just like WPEngine, Kinsta is a managed WordPress hosting provider that is backed by Google Cloud Platform. Kinsta offers a wide range of managed hosting plans and is a dependable choice if you are not satisfied with your current host. So go ahead take benefit of their free migration service for the existing site.
Kinsta maintains several measures to ensure secure services. You will get a free SSL certificate and backup services. That means you don’t have to buy any additional backup services. Furthermore, while hosted on Kinsta, if you ever get hacked, the company is responsible for fixing your site for free.
If you are learning new things, then the Kinsta Staging area is the best feature to make use of. It creates an instant copy of your site so you can run tests on the clone site before applying it on a live site. Kisnta starter packages start at $30/month and offer you 10GB storage, 20K monthly visits, and 50GB Free CDN. All in all, Kinsta is an incredible web host that will not disappoint you whether it’s a matter of performance (speed+uptime) or support services.
Summary
Congratulations! You become a WordPress installation ninja. Now you can easily install WordPress, whether going with an automatic or manual procedure. So did you try installing WordPress after reading the above tutorials? Feel free to share your experience. I really appreciate your time to read this guide.
Any suggestions for me?
Have a nice day.
This is a best guide I have ever seen about WordPress installation
All I can say is Thank you.It’s really a nice post.This is a very detailed tutorial. I like it so much.
Keep up the good work.
You are the best .